.png)
Loan Maintenance / Collateral Loan Upload / Auto Process Collateral Loan Settings
Auto Process Collateral Loan Settings
This page allows the user to set up the collateral loan to be processed automatically. You may also edit the auto process collateral loan settings.
Navigation: Loan Maintenance → Collateral Loan Upload → Forgot Password
Refer to the screenshot:
Expiry date depends on 2 conditions.
1. Loan types
2. Active Loan status
Loan Type
If the user adds, renames, or deletes any loan type on the Loan Type page, it will be reflected in the Loan Type dropdown of the expiry date condition.
Refer to the screenshot:.png)
When the Lender sets up only Loan Type expiry date conditions on the Auto Process Collateral Loan Settings page, then the greatest date will be considered as the expiry date for the loan which meets defined conditions in Basic Client Details page.
 No past date is considered even if the loan meets all the desired conditions of the Loan Type.
Active Loan Status
The expiry date of the loan will be considered based on ON/OFF button of the Active loan Status.
Below are the two ways in which Active Loan Status works:
1. If the Active Loan Status is checked ON, then only the expiration date of Active Loan will be considered for Basic Client Details.
2. If the Active Loan Status is checked OFF, it updates the expiration date with a greater date amongst all the loans.
When the loan meets the defined condition of Active loan status, the greatest date amongst them will be updated.
No past dates are considered even if the loan is active.
The user can select Edit option on the right side of Auto Process Collateral Loan settings screen to select the conditions for the expiry date.
To edit the auto process collateral loan settings, perform these steps:
1. Go to Administration → Lender Details → Auto Process Collateral Loan Settings. Lender Auto Loan Activity Settings page appears.
2. Click Edit button.
3. Select or deselect the Auto Loan Process checkbox, as required.
4. Select or deselect the Include Inactive Clients in Search, as required.
5. Select the E-mail Notification Style checkbox as required.
6. In the E-mail List, select the lender e-mail address from the dropdown list or enter the lender e-mail address.
7. Click the ![]() button to save your record. A message “Lender Loan activity related fields successfully updated” appears.
button to save your record. A message “Lender Loan activity related fields successfully updated” appears.
8. Click the  button to cancel your action.
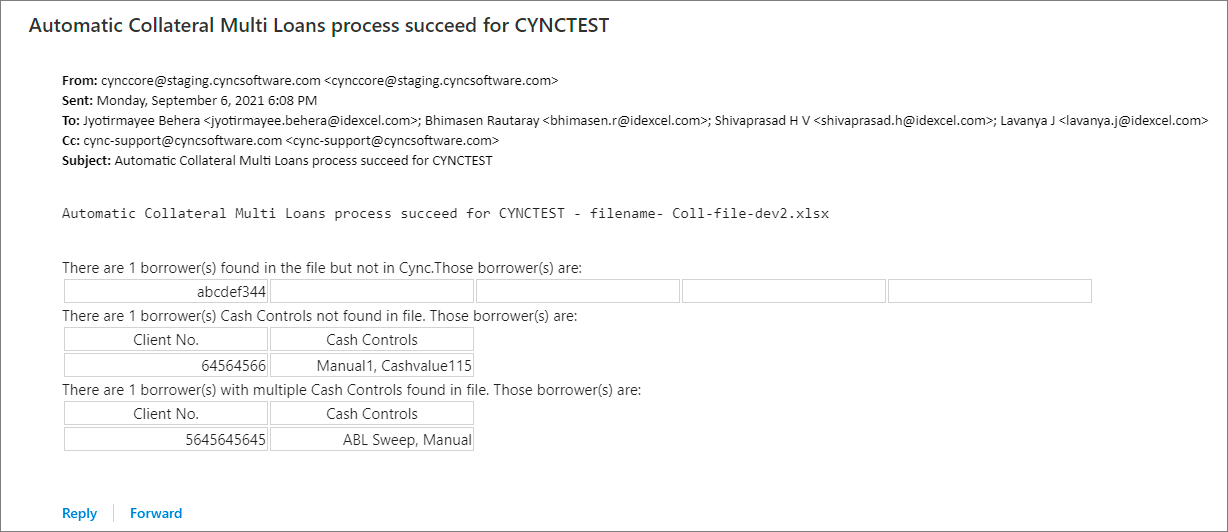
If any exception task gets generated in Task & Upload History page, the system sends an email notification automatically to the respective email ID along with the list of corresponding borrowers and loan id details.
Refer to the screenshot: